|
The [Workflow] options (Figure 1) in the Advanced Quick Set Options and Process/Print Setup of Job Editor allows you to determine how jobs are handled in RIP-Queue.
To use the Workflow option:
(JobEditor)
-
Go to Print tab > Print Setup > Workflow or click the Print Setup icon that is on the right side on the toolbar.
- Select the Workflow options you want to use (Figure 1).
(RIP-Queue)
-
Go to Edit Quick Sets icon on the toolbar or go to Configure Printer > Quick Sets tab and select [New] or [Edit] button. Click Edit > Advanced button and select [Workflow] from a tree.
- Select the Workflow options you want to use.
You can use any of the following options:
 After Processing After Processing
The [After Processing] option determines what happens to a job after it has been processed.
- Delete Source Image
- This option deletes the original source image after the job has been processed. Deleting the source image does not delete the job. The job can still be reprinted, but it cannot be reprocessed.
After Printing
The [After Printing] options determine what happens to a job after it has been printed.
- Archive Job as Space Allows
- This option moves printed jobs to the Buffered Jobs area of RIP-Queue. The jobs are marked with the recycle symbol and deleted as needed to get additional hard disk space for incoming jobs.
- Archive Job Indefinitely
- This option moves printed jobs to the Buffered Jobs area. They are also marked with the recycle symbol, but they are not automatically deleted to get more hard disk space. If space is needed, you will need to manually delete these jobs by highlighting them and pressing [Delete] on your keyboard.
- Delete Job
- This option automatically deletes your job after it has printed.
NOTE: You can reprint jobs from the Buffered Jobs area by selecting them and dragging them into the Jobs Ready to Print area of RIP-Queue.
Job Creation
- Preview Image Before Processing
- This option automatically creates a preview for each job in RIP-Queue before it is printed. If this option is not selected, you may preview an individual job by clicking on the Thumbnail icon in RIP-Queue.
- Make Copy of Image - This option copies the source image file to the work folder instead of referencing the file from where it currently exists. If you are dealing with extremely large files, you should uncheck this option.
- Create Proof Automatically - This option automatically applies proof settings to your jobs. See Proofing for more information.
NOTE: For the [Create Proof Automatically] option to work, the proof settings must first be defined in "Proof Creation Settings" dialog.
See Proofing - Configuring a Proofing Printer for more information.
Process/Print Options
- Reprocess - This option reprocesses the job each time it is printed.
- Print - This option prints the job without reprocessing it.
NOTE: If you make changes to an image between prints, you must reprocess it for those changes to take effect.
Operator
- Hold for Operator
- This option stops a job from printing until an operator chooses to print the job.
- Default Operator Name
- This option is the User name attached to each job. If you have many different users sending jobs from various systems, consider setting the Default Operator Name for each system.
Related Topics
Proofing
|

Figure 1
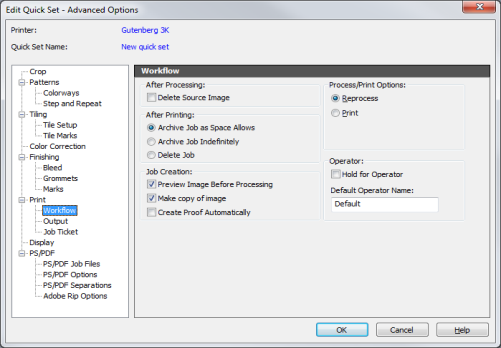
Figure 2
|